In my last post, I decided to forgo the purchase of spice mixes and start with fresh spices and less preservatives in my cooking. I tried this out when cooking fajitas the other night. I think that it turned out fabulous. A lot of the recipes out there are very similar and I tweaked mine to my own tastes. My husband thought that my spice mix was perfect and from there, I was sold. I will no longer spend $1 or more for fajita mix!
Here is my recipe:
Fajita Mix
Makes approx. 3 batches
3 T. Cornstarch
1/2 tsp. garlic powder
1 1/2 tsp. onion powder
1/2 tsp. cayenne (amount depends on how much heat you want)
1 T. cumin
1 T. paprika
1/4 tsp. salt
2 T. chili powder
2 chicken bouillon cubes, crushed
1 T. sugar
Mix spices together well and store in container. Use 2-3 T. of fajita mix with 1 cup water on cooked beef or chicken and vegetables.
Also, I wanted to share something that I learned when researching this fajita mix recipe. Did you know that chicken bouillon cubes could contain MSG? I didn't. I try to not cook anything with MSG because my husband has had hives from MSG before. There is organic chicken bouillon out there that doesn't contain MSG. Luckily, mine did not contain it so I didn't have to make a special trip to the grocery.
Thursday, May 31, 2012
Saturday, May 26, 2012
Make Your Own Spice Mix
Warning- Read close to a lunch or snack break!!

I LOVE spices. If you look in my spice cabinet, you will have a hard time seeing it all and if you touch 1 bottle, 3 bottles fall out... With that being said, I try to rein myself in whenever I shop for spices. Penzeys Spices is my favorite spice shop. They have an awesome magazine/catalog that comes with free coupons (for spices!) and recipes that are flavorful.
Ordinary spices that have been sitting around for 10 years no way compare to fresh, good quality spices. Also, adding spices enhance flavors to foods that ordinarily would be bland and boring. Think garlic, lemony, curry or even pickled vegetables...
The majority of spices out there are not very expensive and a little usually goes a long way. That is why it is silly to go out and buy the little packets of spices for tacos, chili, or pickling. Yes, I have to admit, I buy them too but not anymore! It is convenient but think, most of those spices you probably have in your cupboard already! Also, making the spice mix yourself, you will be able to control what is in there. You probably won't be adding the MSG or preservatives, right? Also, you will save a bundle especially, if you buy the general ingredients in bulk.
Storage Containers: you could save and recycle the old spice jars, use small Tupperware containers, or even use plastic baggies to make your spice mixes. Just make sure they close tight!
Make labels for your spices: you could use scrap pieces of paper to make labels, write with a sharpie on the jar, or do an internet search for some pretty labels to print!
Most importantly: Date your spice bottles!! Some recipes do contain expiration dates listed so it is good to say when you made the spice or if known, when it expires.
I am not an expert when it comes to spices but my rule is it needs to be remade after 1 year. Will it make you sick? Most likely, no. However, the flavor could be compromised.
As I plan and test some of the spice mixes out there, I plan on updating my progress with you and letting you know what my household likes. Do you have a special spice mixes out there? Let me know! I would love to try it!
Tuesday, May 22, 2012
Recovering a Lampshade With A Lighter Fabric
I found this lamp at a yard sale for $5. Forgive me, I didn’t get a pic of the original lampshade and the base together. 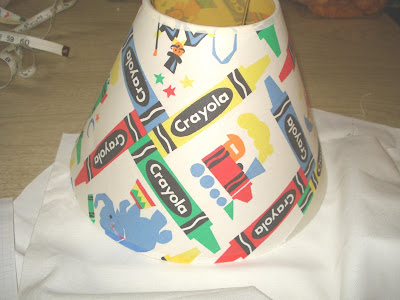 I wanted a white shade with some sort of rubber ducky theme on it. Maybe some yellow bric brac on the edges or other binding. When I draped the white fabric over the original lampshade, I could see the crayon design. I decided to try to peel the fabric away from the fragile plastic underneath. Yes, that was silly…. Sorry, no pictures of that failure attempt!
I started to research what the plastic lining was on a lampshade since I had to start fresh. Turns out it is styrene. I found various styrene sheets at websites such as Hobby Lobby. Instead of paying for shipping, I decided to seek out the Hobby Lobby store in the area because I have never been there. When I got to the Hobby Lobby store, I looked up and down every isle and found every kind of sheet but styrene. However, when I was shopping in the fabric department, I found a huge sheet of plastic for $3.99. I bought 2 sheets-just in case.
So the first thing I did was to finish tearing off the old shade from the wire frame and also trying to keep it in tack. Then I cut the old lampshade in half from top to bottom and traced it on the plastic sheet. Give yourself a little extra on all sides to overlap. If you have too much in the end you can always trim. I repeated the tracing and cutting onto my fabric. Again give yourself extra fabric for wrapping around the plastic liner.
  Next, play with the plastic liner on the wire frame until you get it even. Secure with clothespins. Cut the plastic liner if necessary at the top and bottom to make the circle a bit more even.
  Then, secure again with scotch tape.
  Wrap your fabric around the plastic liner and make sure it fits and you have enough fabric cut. Start near the middle of the shade and spray the plastic liner and smooth the fabric with your hand.
  Keep going around and repeating the spray and smooth process until you get to the edges. Then, fold the edges to a pretty seam. After that, fold the edges over, secure the fabric with spray adhesive and then clothes pins.
  I then added some rubber ducky 3D stickers. Later, I plan to add some yellow edging but I haven’t decided exactly what yet.
  Here are some tips on things I learned after 2 shades: 1. Test your spray adhesive to make sure it sprays clear. I had to make 2 shades because of this. 2. Iron your fabric before you begin to smooth it out because you can see the fold seams on my shade. 3. Have extra plastic and fabric!! If you look at my shade long enough you can see some inconsistencies such as the fold lines, uneven bottom etc etc. That is okay. It is a learning process and I am happy with the outcome. Next time, maybe I will double up on the white fabric to overlap the dark lampshade to make things a little easier on myself.
Total Cost= $23
Lamp/shade= $5
Plastic $8
Fabric $4
Rubber Ducky 3D stickers= $4
Clothes Pins $2
Not exactly cheap but customized for the rubber ducky nursery!

I started to research what the plastic lining was on a lampshade since I had to start fresh. Turns out it is styrene. I found various styrene sheets at websites such as Hobby Lobby. Instead of paying for shipping, I decided to seek out the Hobby Lobby store in the area because I have never been there. When I got to the Hobby Lobby store, I looked up and down every isle and found every kind of sheet but styrene. However, when I was shopping in the fabric department, I found a huge sheet of plastic for $3.99. I bought 2 sheets-just in case.
So the first thing I did was to finish tearing off the old shade from the wire frame and also trying to keep it in tack. Then I cut the old lampshade in half from top to bottom and traced it on the plastic sheet. Give yourself a little extra on all sides to overlap. If you have too much in the end you can always trim.


Total Cost= $23
Lamp/shade= $5
Plastic $8
Fabric $4
Rubber Ducky 3D stickers= $4
Clothes Pins $2
Not exactly cheap but customized for the rubber ducky nursery!
Monday, April 2, 2012
The Planning Stage
Geez! I haven't spent time with you since Jan 17th! I had a lot of New Year's resolutions and one of them was to spend more time documenting the changes in our house. Well, I haven't done that much have I?
I have been very tired and very un-virgo like- not worrying about the day to day schedule of life and making it perfect. What is causing these unusual behavior? Pregnancy! YIPPIE! The baby is due to arrive September 13th- so yes, another Virgo in the house. Please, pray for my husband.
So, I am finally feeling more like myself nowadays-not so sick and nauseous with a little boost of energy. Like my doctor says, I am slowly starting to enjoy the pregnancy. I certainly enjoy the eating and resting part of it. I also am enjoying thinking about what kind of parents my husband and I are going to be. We have wanted a child for so long and finally, it is here! I must admit, I am scared out of my wits and at the beginning, I admit that I thought, "Oh God, what have we done?"
Well, that feeling has subsided and I am starting to plan, plan, plan!
For starters, I was worried that I was going to be out of my clothes rather quickly. I stressed about this and talked about clothes non-stop with my husband. I figured one day I would wake up and not have a thing to put on to go to work except sweats.... I know I drove him crazy. Luckily, with my mother's help (and her huge material closet), she boosted my wardrobe by making maternity tops for me. This has taken a huge load off my shoulders.
I have also been working on some sewing projects. I first raided my "give to goodwill" bag and found plenty of dress pants, jeans, capris, and shorts that I could work with. I then turned them into maternity pants.
Here are some good tutorials:
Maternity Pants 1
Maternity Pants 2
These are so simple and well, it didn't cost much. I purchased 10 yards of 2 inch elastic from ebay for $4. I used pants I was going to give away so that didn't cost anything. For the top band I used old tshirts that were going to be shop towels or goodwill and so, that didn't cost anything either. So, total cost $4 and time spent was about 30 minutes-1 hour for each pair.
Tuesday, January 17, 2012
Sentimental Artwork
Ever since leaving home, I have sought out artwork. I needed something to feel like home, to add my own personal touch, and to fill some blank wall space. Over the years, I had the band posters, chemistry posters, college basketball posters (Go Wildcats!) and goodwill painting portraits. When my husband and I moved in together, we had a lot of things to choose from in our collection. Most artwork we didn't really care about, we just wanted something to fill the wall space.
This post is for the sentimental items that we couldn't put a price on. Most of these pieces of artwork were given to us and possibly the only cost was framing.
Such as, this doily that was croqueted for a wedding gift:

A picture of our 3 little furry ones:

A portrait painted by a family member that hung in an office of the family's business:

A favorite LP with the original stickers and posters:

A favorite movie poster:

Thursday, January 12, 2012
Suggestions for Crusty, Chewy, or Stale Bread

In my house we always have bread. Most of the time, we have a fresh loaf, a stale loaf and most likely, some stored in the freezer. You might say that I am a prude when it comes to bread. I love french bread, pumpernickel, baguettes etc. I don't buy enriched white bread. Too bad, that seems to last forever... Why? I don't know. It is okay for some sandwiches but a lot of times, this is what goes to waste in my house.
It seems like I am always throwing away food that has gone bad so to combat this I have put together a list of suggestions for the not so fresh loaf of bread.
Most of these are for french bread loaves or baguettes or something similar:
1. Croutons
2. Breadcrumbs (put in freezer once crumbed in a baggie)
3. Re-freshed bread
Heat over to 300F, put bread in paper bag. Close and dampen bag.
Bake for 5 mintues. I have not tried this but it sounds interesting as long
as you eat it fast!
4. Bread Pudding
5. Scalloped Pineapple (a new found recipe from my mom! YUM!)
6. Add Bread to dip or add consistency to soup (ex. French Onion)
7. French Toast
8. Panzanella (or bread salad)
9. Stuffing
10. Open-face sandwiches
11. Cinnamon Toast
12. Toasted or grilled sandwiches
13. Bread dumplings
If I don't have a use for the bread that is a little stale, I just pop the loaf (covered in a plastic bag) in the freezer.
Monday, January 9, 2012
The Powder (Blue) Room Con't
I never realized until this post how hard it is to get a picture of the entire bathroom!
Yesterday, I discussed our bathroom updates including the removal of tile and wallpaper, updating paint,and installing some sinks.
Today, I am going to show you the finishing touches- the curtains, the homemade seat cover, and some art work. The curtains were purchased from a yard sale for $4, I think. I liked the gray, blue, and brown stripes. When I saw these, I immediately thought of our bathroom because we had been discussing dark gray as a color in the bathroom and these curtains included the blue tile color. (The shower and the floor are blue tile.) The curtains used be much, much longer but that was a little unnecessary for the bathroom so I cut them off and hemmed them. Then, I had leftover fabric left to make that toilet seat cover mentioned here.

We decided on chrome accents such as the chrome wall switch plate (Lowe's, $6) and chrome electrical cover (Lowe's, $6). The picture frames (BOGO Joann Fabrics $12) were also a chrome finish. Since the bathroom was beginning to look a little sci-fi, we decided to frame some movie posters that we cut out of a movie poster book of Mothra and The Day the Earth Stood Still. The poster book was purchased on ebay for $10.


Subscribe to:
Posts (Atom)